Few things in life are as appealing as free money. For that reason, few things set off as many alarm bells as the promise of free money! After all, if something sounds too good to be true, it probably is… Right?
We usually don’t post these type of posts but in this case, the offer of free money has been tested by our team to be genuine and safe! The amounts on offer are also worth your time, assuming you hold a fair amount of bitcoins.
With Method 1 (Byteball), you can make for roughly $50 for every full bitcoin which you own. With Method 2 (Clams), you can make around $32 for every active Bitcoin, Litecoin or Dogecoin address which you owned before the 13th of May 2014.
Note: the sums mentioned above depend on the current market value of Byteball ($800) and Clams ($6.90), so your precise reward will vary over time… In both cases, you can either keep your free altcoins or instantly convert them to Bitcoin, another altcoin, or fiat.
Does this still sound too good to be true? Well, there are a couple of minor strings attached:
1) Some manageable privacy risk, which we’ll show you how to mitigate, and
2) Performing a couple of moderately-advanced wallet functions, which we’ll guide you through in detail.
Why Are Projects Giving Away Free Money?
As bootstrapping is the hardest part of launching any new cryptocurrency, the successful distribution of coins to new users is critical. If nobody’s using a new coin, then it doesn’t matter if it has amazingly innovative technology, skilled developers, or a passionate core community.
Metcalfe’s law states that the value of a (telecommunications) network is proportional to the square of its users, and this law is equally applicable to cryptocurrency.
2 users = 1 connection, 5 users = 10 connections, 12 users = 66 connections, etc.
It’s clear from the above diagram that the busiest network is the most useful, therefore the most valuable and most likely to attract ever more users in a positive feedback loop. As the altcoin market is beyond saturated – 756 and counting – competition for users is incredibly fierce…
Hopefully it’s starting to make sense why certain coins are just given away – and your “too good to be true” alarm is fading!
As a distribution method, giving away quantities of a new coin to Bitcoin holders – individuals with a proven interest in cryptocurrency – is perhaps the surest way to build an initial base of receptive users. If the new coin also delivers (in terms of technology, economy, interest and so on), it stands a great chance of gaining the initial traction necessary to rise above its competitors.
How to get free coins with Byteball
Byteball (GBYTE) was released in September of 2016 and is notable for not using a blockchain to order transactions, but rather a Directed Acyclic Graph (DAG). If you’ve ever mined Ethereum you may be familiar with this term. Indeed, Byteball is sometimes touted as the Ethereum-killer, as it offers lightweight peer-to-peer smart contracts. These contracts enable conditional payments, prediction markets, insurance, betting and various bot-operated markets from within the standard client. Byteball also provides a stealth-coin asset, known as Blackbytes.
“DAG-chain” example from the Byteball white paper, G being the genesis unit.
Method #1 – Byteball’s Offer
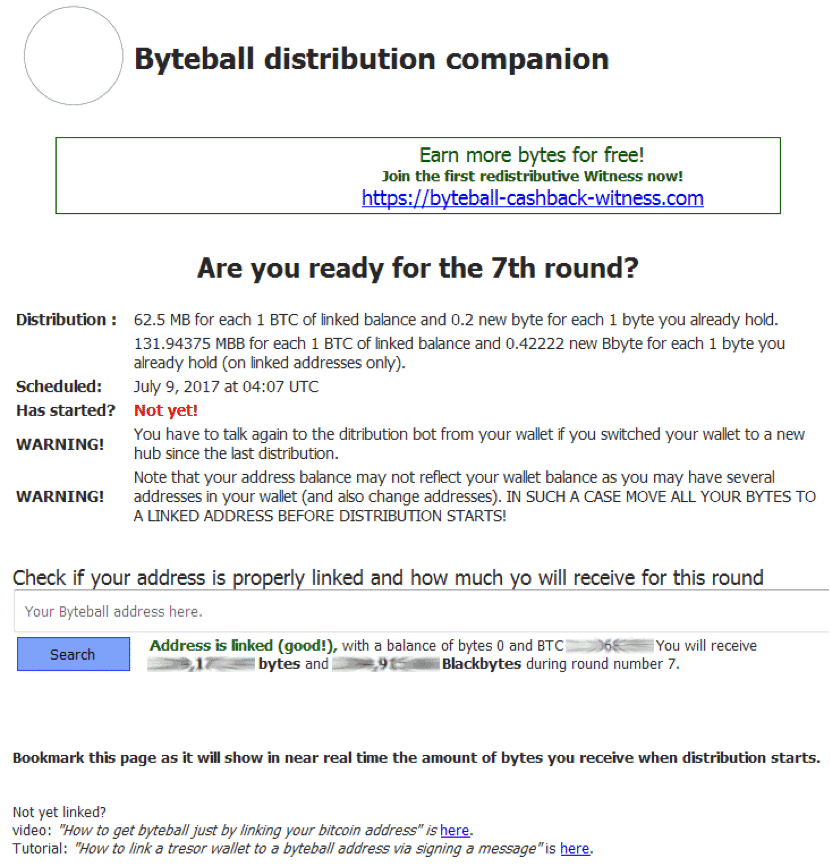
Every full moon, you’ll get free bytes and blackbytes for all the Bitcoins over which you can prove ownership – fractions can count as well. The next drop will occur at around 4:07 AM (UTC) on July 9th 2017. Each bitcoin will earn you 0.0625 bytes (currently worth around $50) and 0.132 blackbytes (currently worth around $2.50).
These Byte drops will continue through 2017 and perhaps into 2018, until all GBYTE is awarded. Roughly 25% has been distributed thus far, so this is a medium-term, repeating opportunity!
How to Claim Your Bytes
Step 1 – Wallet Installation
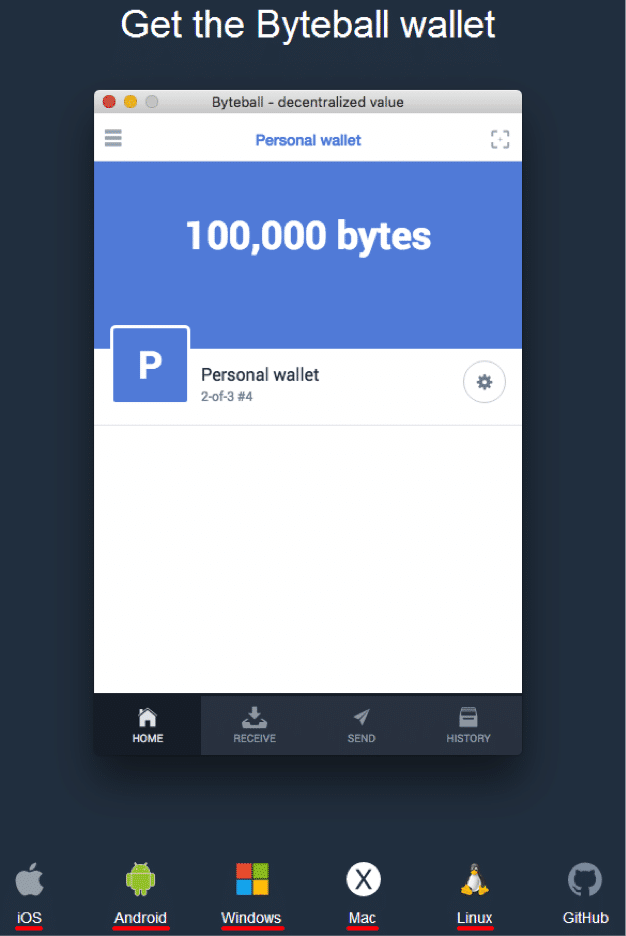
Download and install the correct Byteball wallet for your system. All major platforms, including mobile, are supported. Opt for the light / quick wallet if prompted. If running on a 32-bit version of Windows, you can try this 32-bit test version of the Byteball client software.
Step 2 – Initialize the Bot
After installation, open the wallet and click this link on the Byteball wallet page:
This will add the “Transition bot” to your Byteball wallet. This bot handles the assignment of new bytes and blackbytes to your wallet, based on your bitcoin holdings (as well as any existing bytes or blackbyte holdings – we’ll cover this aspect later).
Step 3 – Talk to the Bot
An initial address will be automatically created by your wallet. Now it’s time to talk with the bot!
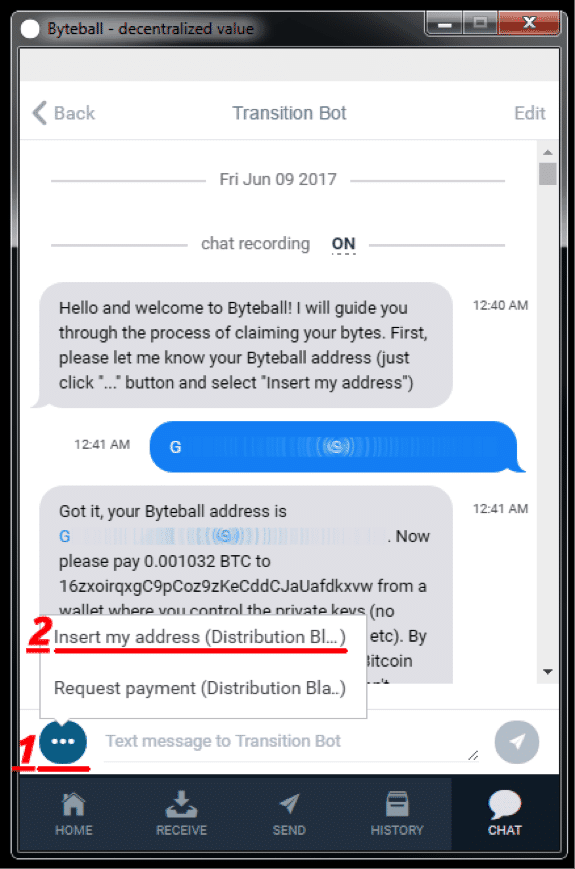
If the bot’s window isn’t already open, click the “Chat” tab
at the bottom right corner of the wallet interface.
Then select the “Transition Bot” as your new conversation partner
(don’t expect scintillating repartee but you can look forward to some free coins!)
Step 4 – Link the Bot with Your Receiving Address
An interaction with the bot is now initiated. The first step, as the bot explains, is to give the bot your Byteball address. This address was automatically generated and named by your wallet previously. Click the ellipsis bubble next to the text input bar and then select “Insert my address…”
32 character wallet addresses is blurred for privacy reasons.
Step 5 – Prepare to Sign for Your Bitcoin Addresses
The bot then requests a small Bitcoin payment to a Bitcoin address controlled by the Byteball team. While this is a viable method to prove ownership, there’s another method which is both faster and free – message signing.
At this point, familiarity with the functions and features of your Bitcoin wallet will be extremely helpful. As there are so many Bitcoin wallets available, it’s impossible for this guide to cover all of them. We will demonstrate how to sign for an address using the Bitcoin Core full wallet and the Electrum light wallet. If using a different Bitcoin wallet, please consult its documentation for help on the following 3 steps…
Step 6 – Display Address Balances
In order to know which addresses to give the bot and sign for, it’s necessary to examine all the addresses contained within your Bitcoin wallet addresses. Note that so-called change addresses may not be displayed by default within your wallet.
Unless all your Bitcoin payments were received by a single address (which is not recommended for privacy reasons), your wallet’s balance will be composed of amounts held within various addresses under your wallet’s control.
It’s necessary to inform the Transition bot of every address containing a significant amount of Bitcoin. These amounts will be totalled by the bot to determine how many bytes and blackbytes you’re eligible to receive.
Bitcoin Core:
You may display all your Core addresses which hold value by opening the Console and entering the listunspent command:
Click “Help” then select the “Debug window”.
Select the “Console” tab then enter the listunspent command.
Core will then list non-empty addresses and their values. Note down which addresses contain funds (copy-pasting the info into a text file is the easiest way). This list is especially useful for finding change addresses not automatically listed by the Core wallet in Step 8.
Electrum:
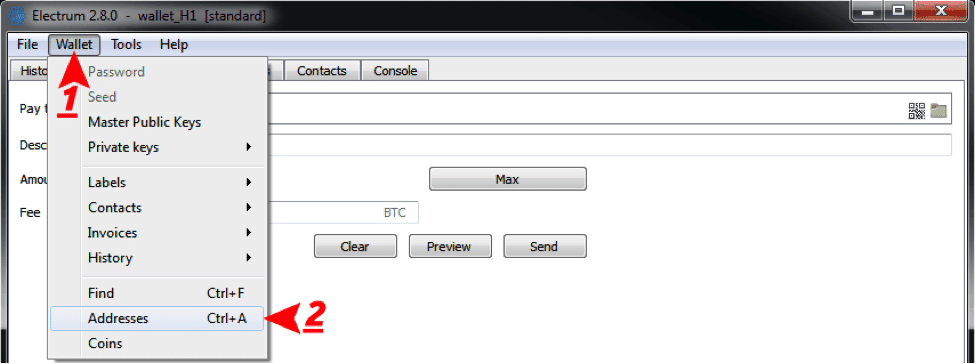
If the “Addresses” tab isn’t visible, click the “Wallet” menu and then click “Addresses.”
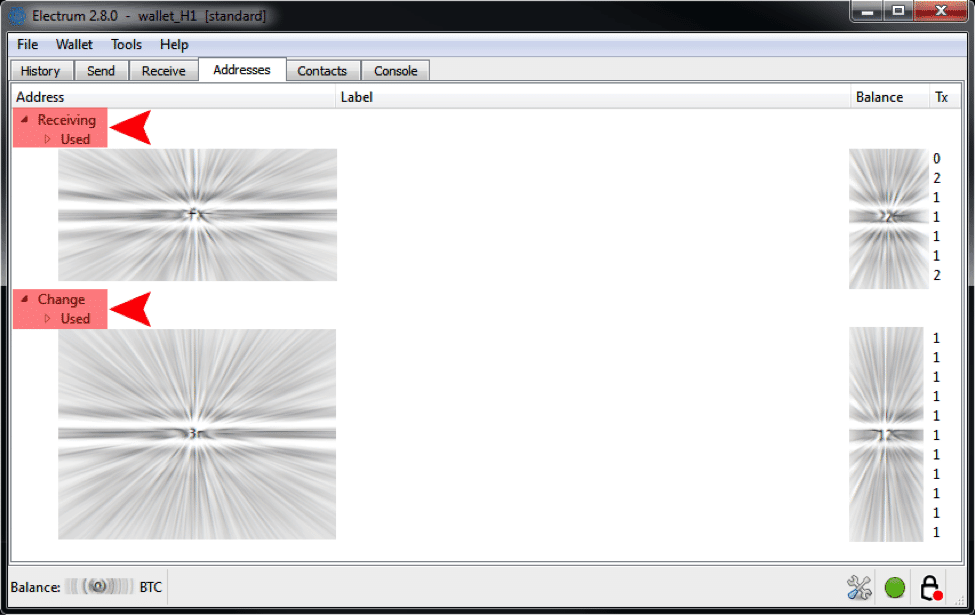
Ensure that the “Receiving” and “Change” lists are expanded.
Now you can view all the addresses which hold your bitcoins, not just the receiving addresses which your wallet regularly displays. We’re getting under the hood of your Bitcoin wallet here; understanding how change addresses work will help you to improve your privacy in future.
Step 7 (Optional) – Consolidating Multiple Bitcoin Addresses
Combining multiple addresses into a single address can save a lot of time, depending on the number of addresses you intend to sign for. It takes about one minute to complete the signature process for each address, so decide accordingly.
To consolidate your addresses, simply send all your bitcoins to an address under your control. This should be a new or existing receiving address within a wallet you own.
Caution: perform this step well in advance of the next byte drop – at least a week in advance to be on the safe side. If your consolidating transaction isn’t confirmed by the time the drop occurs, you’ll miss out on the opportunity. Wait for a lull in Bitcoin network activity – these usually occur over weekends – and consult our guide for info on setting an appropriate fee.
Step 8 – Sign Text Messages Using Your Bitcoin Wallet
The same private key used to authorise payments from a Bitcoin address may also be used to create an un-forgeable cryptographic proof which links that text with that particular address. This process is known as signing and it’s entirely secure – see the below section, “A Note on Signing Security Concerns”.
Unfortunately, some personal wallets and most exchange wallets don’t feature signing functionality. If your wallet doesn’t support signing, you’ll either have to send the suggested micropayment to the Transition bot’s Bitcoin wallet or transfer your bitcoins to a wallet which does support signing.
This BitcoinTalk forum post, although slightly out-dated, provides a lot of helpful information on which wallets support signing, as well as how to sign with them. Here’s how the process works, in 3 simple steps:
1) This first step requires a little copying-and-pasting of addresses between your bytes and Bitcoin wallets.
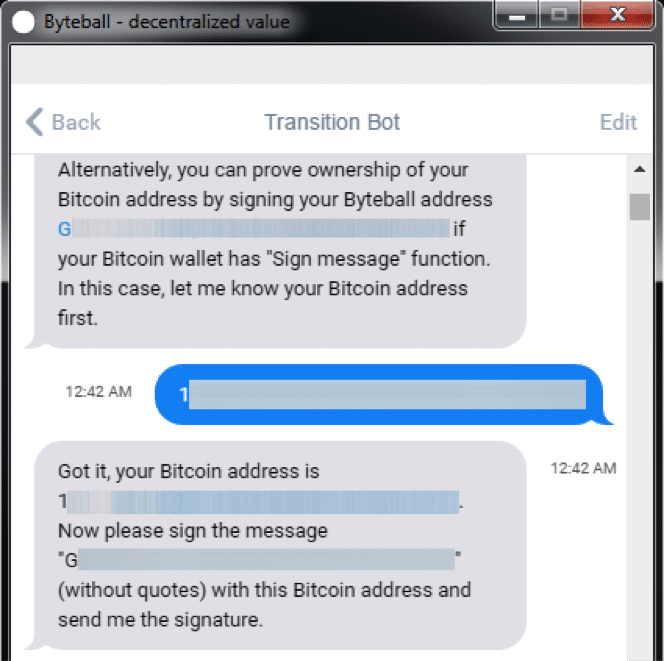
The Byteball bot asks for a Bitcoin address. Give it one which contains BTC. The bot will then ask you to sign your auto-generated Byteball address, using the provided Bitcoin address.
2) Here’s how to sign your Byteball address using your Bitcoin address(es):
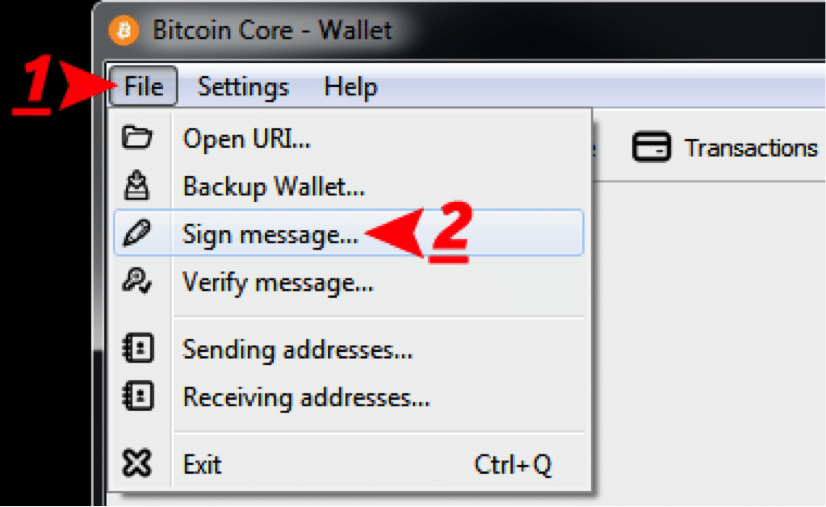
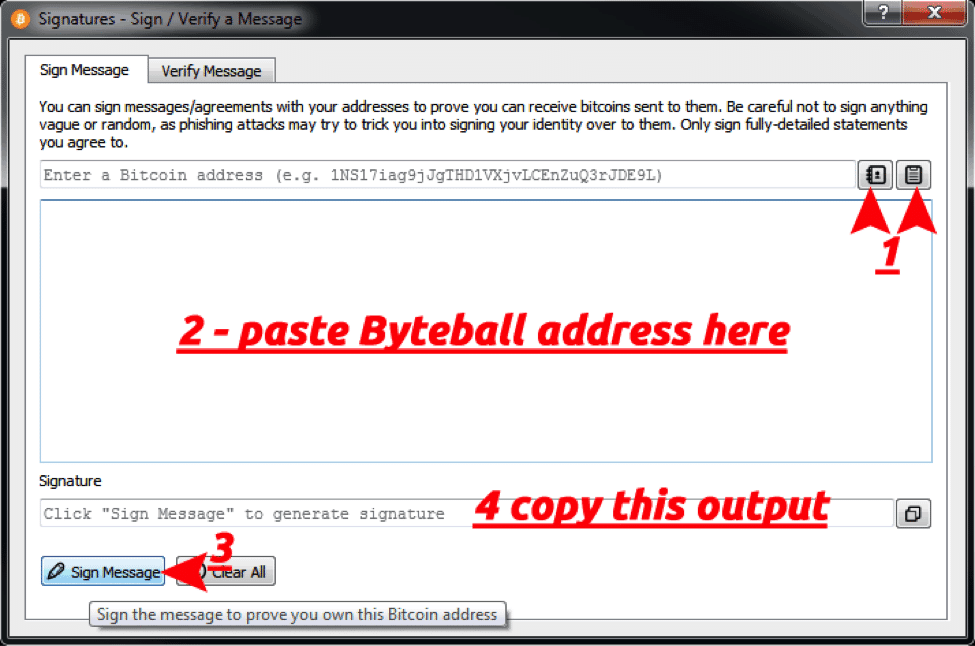
Bitcoin Core:
Select “File” menu then the “Sign message…” tool.
For Part 1, click the left button to select from a list of receiving addresses
(listunspent reveals which contain funds).
Clicking the right button will paste any change address you copied from the
listunspent command run in the wallet’s Console (Step 6).
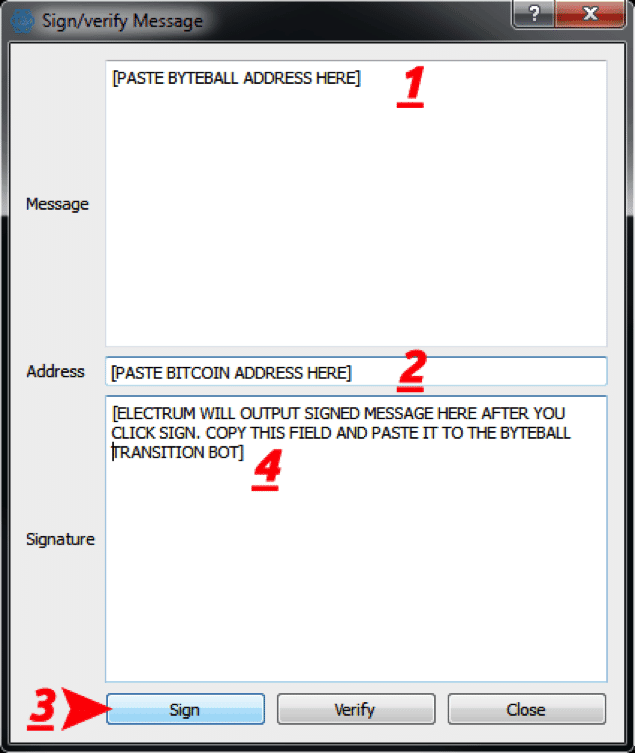
Electrum:
Select the “Tools” menu then the “Sign / verify message” option.
Paste the relevant addresses and click Sign. Now copy the output.
Signing is a useful operation, in the event you ever wish to prove ownership of a Bitcoin address. However, as the Core wallet advises, you should always name and date any statements you sign, particularly those with legal implications.
In this case, your signature can only be used to associate your Bitcoin addresses with a Byteball address. This is unlikely to cause you any problems in future, although do see the cautionary note contained in the below section, “A Note on Privacy Concerns.”
Step 9 – Give the Bot Your Signed Message
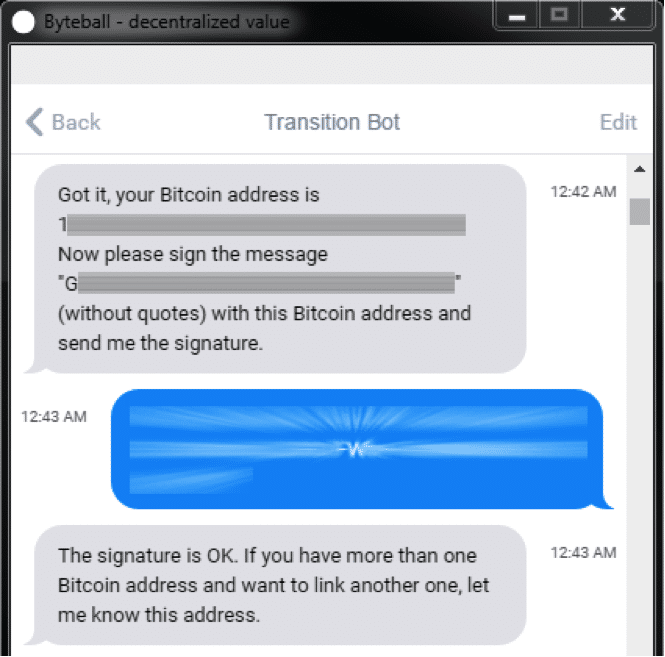
Get the signed message and paste it to the Byteball Transition Bot. If all goes well, the bot will let you know:
The Bot now knows you own the particular Bitcoin address you signed for!
If you were using a consolidated Bitcoin address, the process is now complete! If not, repeat Steps to 6 – 9 until you’ve signed your Byteball address with all your value-containing Bitcoin addresses.
Step 10 – Check Your Total Pending Byteball and Blackball
Visit this website and paste your Byteball address into the field provided. Within a few minutes of completing the signing procedure, it’ll display the total amount of bytes and blackbytes you can expect to receive in your Byteball wallet when the drop occurs.
Multiply your number of complete bitcoins by the expected byte reward and compare the result by the total displayed by the website. If the website displays less than expected, it can only mean that you’ve forgotten to sign for one or more addresses.
I got the coins! Should I Sell or Should I Hold?
Once you have your free GBYTE, you must decide whether to hold it or sell it! Below are some points which may help you to decide!
Daily prices of Byteball on Bittrex, its biggest market.
Note the run-up to June 9th (crosshaired) and the subsequent dip and recovery.
Reasons to Hold
- The pattern so far has been that Byte price dips on the drop as a percentage of newly-awarded coins are instantly sold, but then recovers shortly thereafter. This implies that price will continue to rise, at least until the final coins are awarded.
- Holding GBYTEs in your linked wallet makes you eligible for a 20% bonus in the amount you’ll receive (based on your linked bitcoins) in the next distribution round. A similar bonus also applies to any blackbytes you hold.
- Byteball has yet to be listed on the major altcoin-only exchange, Poloniex. A price spike may be anticipated when (or if) it gets listed there, or on any other big exchange.
- Byteball’s DAG technology is promising… Smooth scaling, easy smart contracts and fast transactions are implied. Review the website and white paper for more details.
- Byteball’s distribution method and relative lack of promotional hype suggests a serious project geared towards major long-term success, rather than short-term gain. This would represent something of a welcome exception in the altcoin space.
Reasons to Sell
- If you really need bitcoins or fiat in a hurry, then it’s better to sell bytes than a kidney!
- Byteball’s code hasn’t been subject to any intensive peer review. It could contain secret bugs or exploits which harm the system.
- The DAG concept, as supported by Witness nodes, has also yet to be reviewed and challenged by cryptocurrency experts. There exists the possibility of a misaligned incentive structure or unknown attack(s) which could damage or even break Byteball’s security model.
- Byteball’s real-world resilience to a persistent fork – or even multiple simultaneous forks – has yet to be established.
It’s up to the individual to weigh the above points and come to a decision. Good luck!
A Note on Security Concerns
It occurred to this author that, if the Byteball wallet were a particularly crafty piece of malware, it might trick users into providing signatures which could be used to authorise a transactions from users’ Bitcoin wallets – and drain them! However, this concern may be safely dismissed, for the following reasons:
1) Six Byte distributions have been completed thus far, with no reports of any such malicious activity.
2) The Byteball wallet generates the text to be signed (specifically, your Byteball address) before requesting any signatures from your Bitcoin wallet. It would have to a remarkably sophisticated malware to know which of your
3) The following conversation with Bitcoin Core developer, Gregory Maxwell, in which he confirms that preventions against such a signature attack have been implemented in Bitcoin:
HeySteve: is it possible to construct a message to be signed by a bitcoin address, such that the signed message could also be a signature used to authorise a transaction?
gmaxwell: If by “signed by a bitcoin address” you mean the standard signmessage functionality, then the answer is No because we very carefully constructed signmessage so this could never be possible.
What transactions are signing is sha2(sha2(masked transaction)) and what signmessage signs is sha2(‘Bitcoin signed message:’ || message)
(I might be slightly wrong about the exact string.)
I think the very early draft of that functionality didn’t do that– e.g. sha2(message), and someone (probably me or Peter Todd) pointed out that you could be tricked into signing something that was actually a transaction hash.
HeySteve: yes, that was my worry. I signed a series of 32 character altcoin addresses using my Bitcoin addresses
gmaxwell: Yea, we’re looking out for you. 🙂
A Note on Privacy Concerns
If you follow the above procedure, the Byteball developer and anyone he shares the information with(willingly or otherwise) will be able to associate your IP address with all Bitcoin addresses for which you signed. Further, it would be possible for other addresses you own to become associated with your linked addresses.
You may mitigate these issues immediately after the drop occurs by anonymizing your bitcoins.
Method #2 – CLAMs Offer
Clams / Clamcoin (CLAM) is a Proof of Stake cryptocurrency launched in May of 2014. By the process known as “digging,” CLAMs are freely distributed to historical owners of Bitcoin, Litecoin and Dogecoin. All addresses of significant value, created prior to the 12th of May 2014, are eligible for digging.
In other words, you can only claim free CLAMs if:
- you have a BTC, LTC, or DOGE wallet (backup) from May 2014 or earlier, and
- The address contained value(s) above “dust,” or the standard transaction fee at the time.
You will receive 4.6 CLAM for each suitable address! As the value of Clams has ranged between $5 and $7 of late, this can add up to a considerable windfall! Unfortunately, it’s difficult to calculate your expected CLAM reward beforehand. However, if you were an active Bitcoin user in mid-2014 and are familiar with wallet management procedures, then digging for Clams will very likely prove worthwhile!
How to Claim Your Clams
Step 1 – Wallet Installation
Visit the Clams Client website to download and install the appropriate graphical client for your system.
Step 2 (Optional) – Download Blockchain Bootstrap File
Syncing your Clam wallet with the current version of the blockchain can take a long time, particularly if you have a slow internet connection.To speed up the process, download this ~1.5 GB blockchain bootstrap as a file or torrent. Place this file within the same folder as your Clams wallet.dat file – use your OS’s search feature to locate this folder or consult this wiki page (replace “Bitcoin” with “Clam”).
This optional step allows the Clam client to sync primarily from your hard drive, rather than the internet. Further details on this process may be viewed here.
Step 3 – Prepare Your Bitcoin, Litecoin or Dogecoin Wallet for Digging
Unlike the Byteball process described above, Clams does accept address signatures – it requires your sacred private keys! As sharing the private key to an address allows the spending of funds contained therein, it is highly recommended that all funds be moved to a new wallet before performing this process!
Although Clam’s founder, dooglus, has been a respected member of the Bitcoin community since at least January of 2011 and there have been no reports thus far of any misbehaviour by Clams wallets… Nevertheless, sharing your wallet’s private keys (even with Satoshi Nakomoto himself) is the single most dangerous action any cryptocurrency user can perform – akin to sharing the login details of your online banking account.
This is why we strongly recommend first transferring any and all funds within the “dig wallet” to a new wallet. This would be a great excuse to invest in the security of your cryptocurrency holdings by purchasing a hardware wallet, if you haven’t already got one. Hardware wallets require the generation of a new wallet in order to securely store your funds.
If you’ve been delaying the purchase of a hardware wallet due to their expense, consider Clams as a way to get one at a discount – or even free!
There’s no time limit on the Clams distribution, so you have ample time to research the best choice of a new wallet. If you prefer your existing wallet, you may be able to create an additional wallet within the same software – Electrum offers this functionality, for example.
Whatever you decide – either getting a hardware wallet or creating an another software wallet – ensure that your new wallet is properly set up and protected before importing all funds from the old dig wallet. Remember to backup your new wallet.dat file or cryptographic seed, plus set and backup a password.
Once your old dig wallet is empty – and remember to reroute any pending payments to an address within your new wallet! – it’s safe to proceed with the next step.
Step 4 – Digging for Clams!
The graphical wallet makes importing your old BTC / LTC / DOGE dig wallet’s wallet.dat file (which contains the private keys) a simple process. Before performing this action, ensure that you’re importing the correct file – that belonging to your old wallet! If you don’t know where this file is located, refer to Step 2 (and raise your wallet backup awareness).
To avoid any possible confusion, consider renaming the directory containing your old dig wallet to something like old_Bitcoin_wallet_backup. Don’t delete this file either – you never know when it might allow you to take advantage of another altcoin distribution!
Ensure that your wallet has fully synced before proceeding any further.
Now perform the following actions in your Clam wallet:
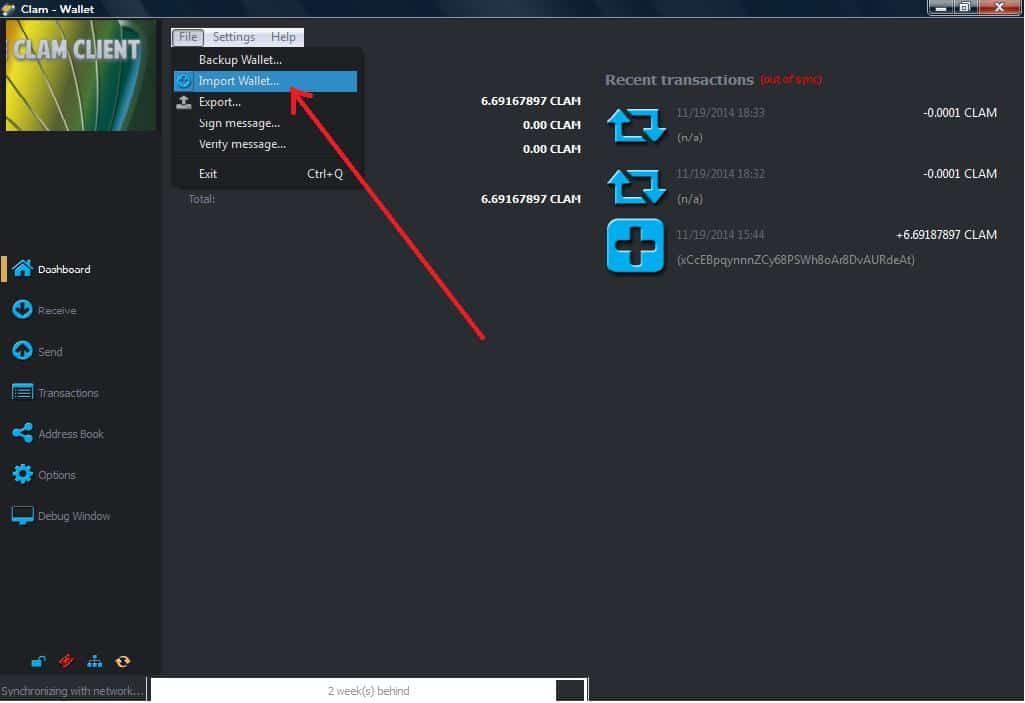
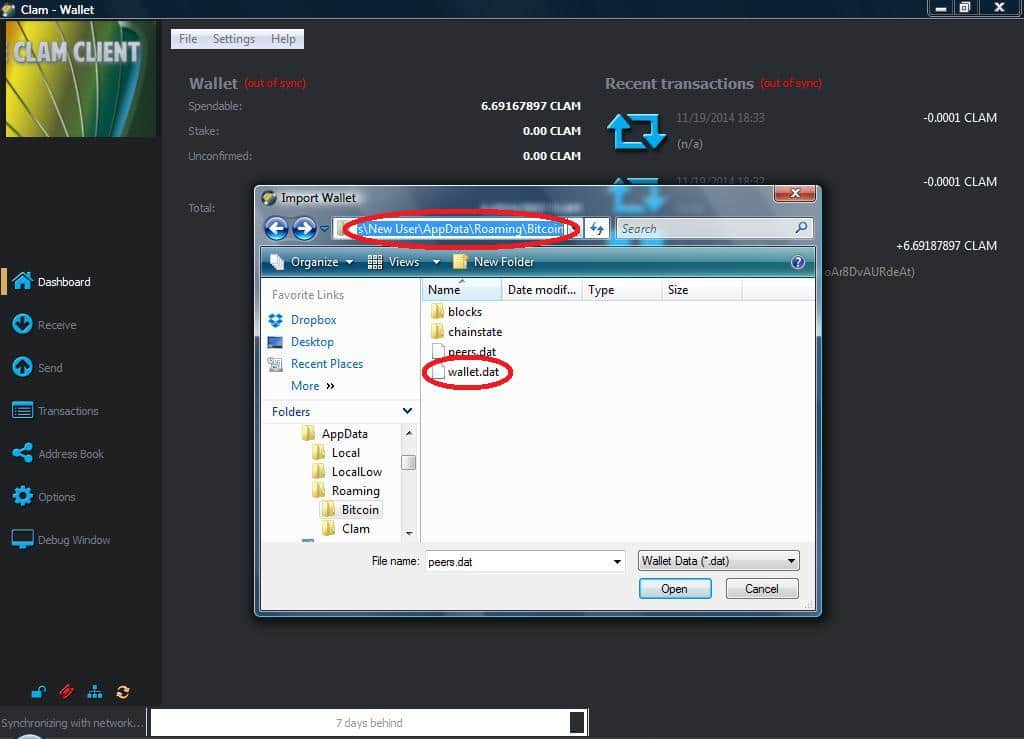
If you’re unable to locate the wallet file, configure your system to display hidden folders and files. The Clams wallet will now do the rest! You should see your freshly-dug Clams appear shortly.
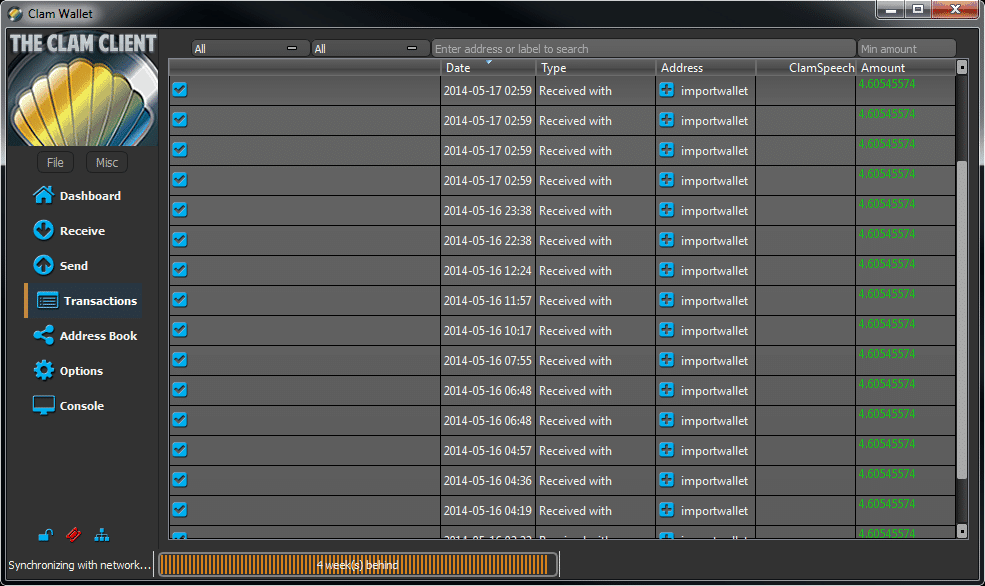
Should I Sell or Should I Hold?
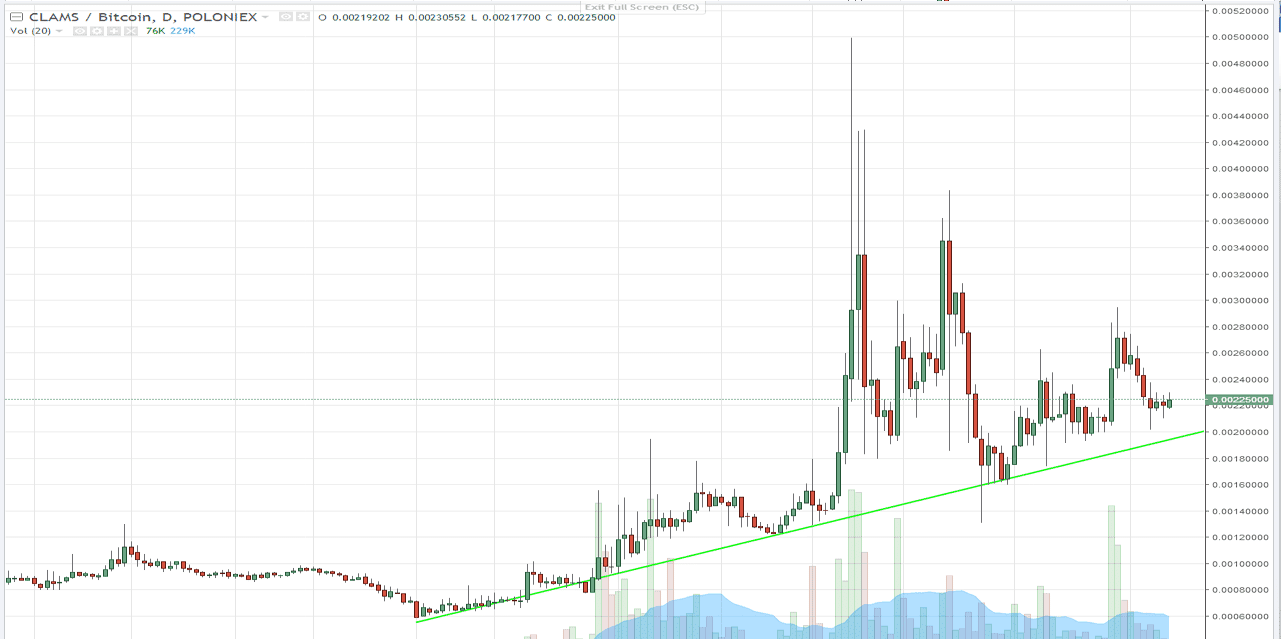
Once you have your Clams, you’ll need to decide what to do with them! Although far off its all-time high, like many altcoins, Clams’ price has been on the rise lately:
CLAM-BTC daily chart for 2017 displays a clear uptrend.
To aid in your decision, here are a number of positive and negative factors to take into consideration.
Reasons to Hold
- Clams is a Proof of Stake coin so, just by holding CLAM in an always-open wallet, you’ll earn more coins over time through the staking process.
- The popular and long-running Just-Dice gambling site allows you to invest your CLAMs in the site, earning a share of its steady profits. The site will also give you the staking rewards for your invested coins. If left alone for a while, your investment will accrete steadily – rather like a pearl!
- Clams are available for (leveraged) trading on the popular altcoin exchange, Poloniex.
- Although not technically-innovative, Clams is based on proven blockchain technology.
Reasons to Sell
- If you need fiat or bitcoins, you probably need them more than CLAM.
- Although there are projects in the pipeline, the coin is not being developed aggressively.
- The Clam economy is centred around Just-Dice, with little other activity at present.
Any further questions you might have are best asked in the Just-Dice chat box. This is the most active discussion forum for Clams, where you’ll probably be able to get your question answered by dooglus himself.
Bonus Free Money Method – Stellar!
Stellar is planning a second distribution of lumens to Bitcoin holders. The distribution period is from the 27th of June until the 27th of August. This author did not participate in the previous Stellar drop so can’t comment on the process. Further details are available on the Stellar site; essentially one needs to sign for active Bitcoin addresses and provide a Facebook account, or hold coins on a participating exchange.
The Fairness of a “Bitcoiner Drop” Distribution
Effectiveness isn’t the only criteria for judging a coin’s distribution. Allegations of an unfair or selfish distribution can harm a coin’s reputation over the long term. Distributing new coins to holders of existing coins is arguably the fairest way to distribute a new coin, assuming the initially held coins were fairly distributed.
If you’ve tried this method yourself please let me know your experience in the comment section below!
Good luck!
Steven Hay
Latest posts by Steven Hay (see all)
- How to Use Your Bitcoin Wallet to Get Free Coins – June 25, 2017
- Bitcoin Volatility Explained – May 23, 2017
- Bitcoin VS Ethereum: Cryptocurrency Comparison – March 26, 2017
https://99bitcoins.com/how-to-use-your-bitcoin-wallet-to-get-free-coins/








 BTC-USD
  ETH-USD
  LTC-USD
  XRP-USD